The steps below outline the simple setup needed to connect CompanyCam and naturalForms.
What is CompanyCam
CompanyCam is a photo documentation and project management platform designed for contractors, technicians, and project managers in various industries, including construction and field services.
What Can You Do
- Use industry leading forms or create your current custom forms.
- Prefill project data directly into forms from CompanyCam.
- Collect form information (in the field or at the office) and auto-update projects.
- Add custom sketches and drawings to the project.
-
Collect unlimited signatures and approvals for all documents.
How Does It Work
Prefill your project information from CompanyCam, fill out your forms, capture signatures and automatically sync the form, sketches and photos to the specific project within your CompanyCam account.
Getting Started
To enable the integration you will first need both CompanyCam and naturalForms accounts. You can find out more about CompanyCam on their website. Once you have both accounts, as an admin of the systems follow the steps below to connect the applications:
1. Add Forms (Templates)
A. Upload PDF Background | To add a form or what is called a template in naturalForms, start with the form design and layout which is created totally outside of naturalForms using any industry standard tool (i.e. Word, Excel, Adobe), and then save the form design as a PDF. After completing the design (look and layout) of the form and having a clean PDF, add that form into naturalForms via the Designer accessed from within the Templates page. Check our Designer overview video and for exact details follow the steps for Adding a Template.
We recommend that the form design considers the use of the tablet or phone and allows proper spacing for fields such as checkboxes or tight field spacing. We also recommend that you do not use 'scanned in' PDFs as these types of PDFs tend to be low quality and very large in file size.
B. Setup Smart Fields & Rules | To add templates to naturalForms, you will use our Designer tool which allows you to bring in the PDF background and overlay it with our proprietary digital intelligence making your custom forms smart forms. Don't worry, adding your forms is still super simple and quick to complete so your team will be filling out forms before you know it.
Once you have uploaded your PDF into the Designer, you'll simple add the field overlays to your PDF background by using what we call Field Tools. Just follow our Field Tools Overview to complete this step.
Additional intelligence such as calculations, conditional mandatory, logic and other related rules can be easily added to the template. To setup rules just follow our Rule Guides.
C. Name 'Identifiers' for Prefill | By default your data from CompanyCam will prefill from your account into forms (also known as Documents). In order for this to occur you'll need to map the field 'Identifier' value in the Field Settings of a field in the Designer with the correct CompanyCam field name. Below is a screen shot of where this is located in the Designer:
The default fields available for CompanyCam prefill are:
CompanyCam |
naturalForms |
| Project Name | ProjectName |
| Project Address 1 | Address1 |
| Project Address 2 | Address2 |
| City | City |
| State | State |
| Zip | Zip |
| Country | Country |
| Contact Name | ContactName |
| Contact Phone | ContactPhone |
| Contact Email | ContactEmail |
After you have completed the steps above your template will be setup and ready to be assigned to a user and for the integration to be enabled.
2. Connect the Integration
Watch how to connect the integration:
As an admin, sign in to your naturalForms web account and open the Integrations page. Find CompanyCam in the list.
Expand CompanyCam and click Connect CompanyCam (or Reconnect CompanyCam if you're re-authorizing an existing connection).
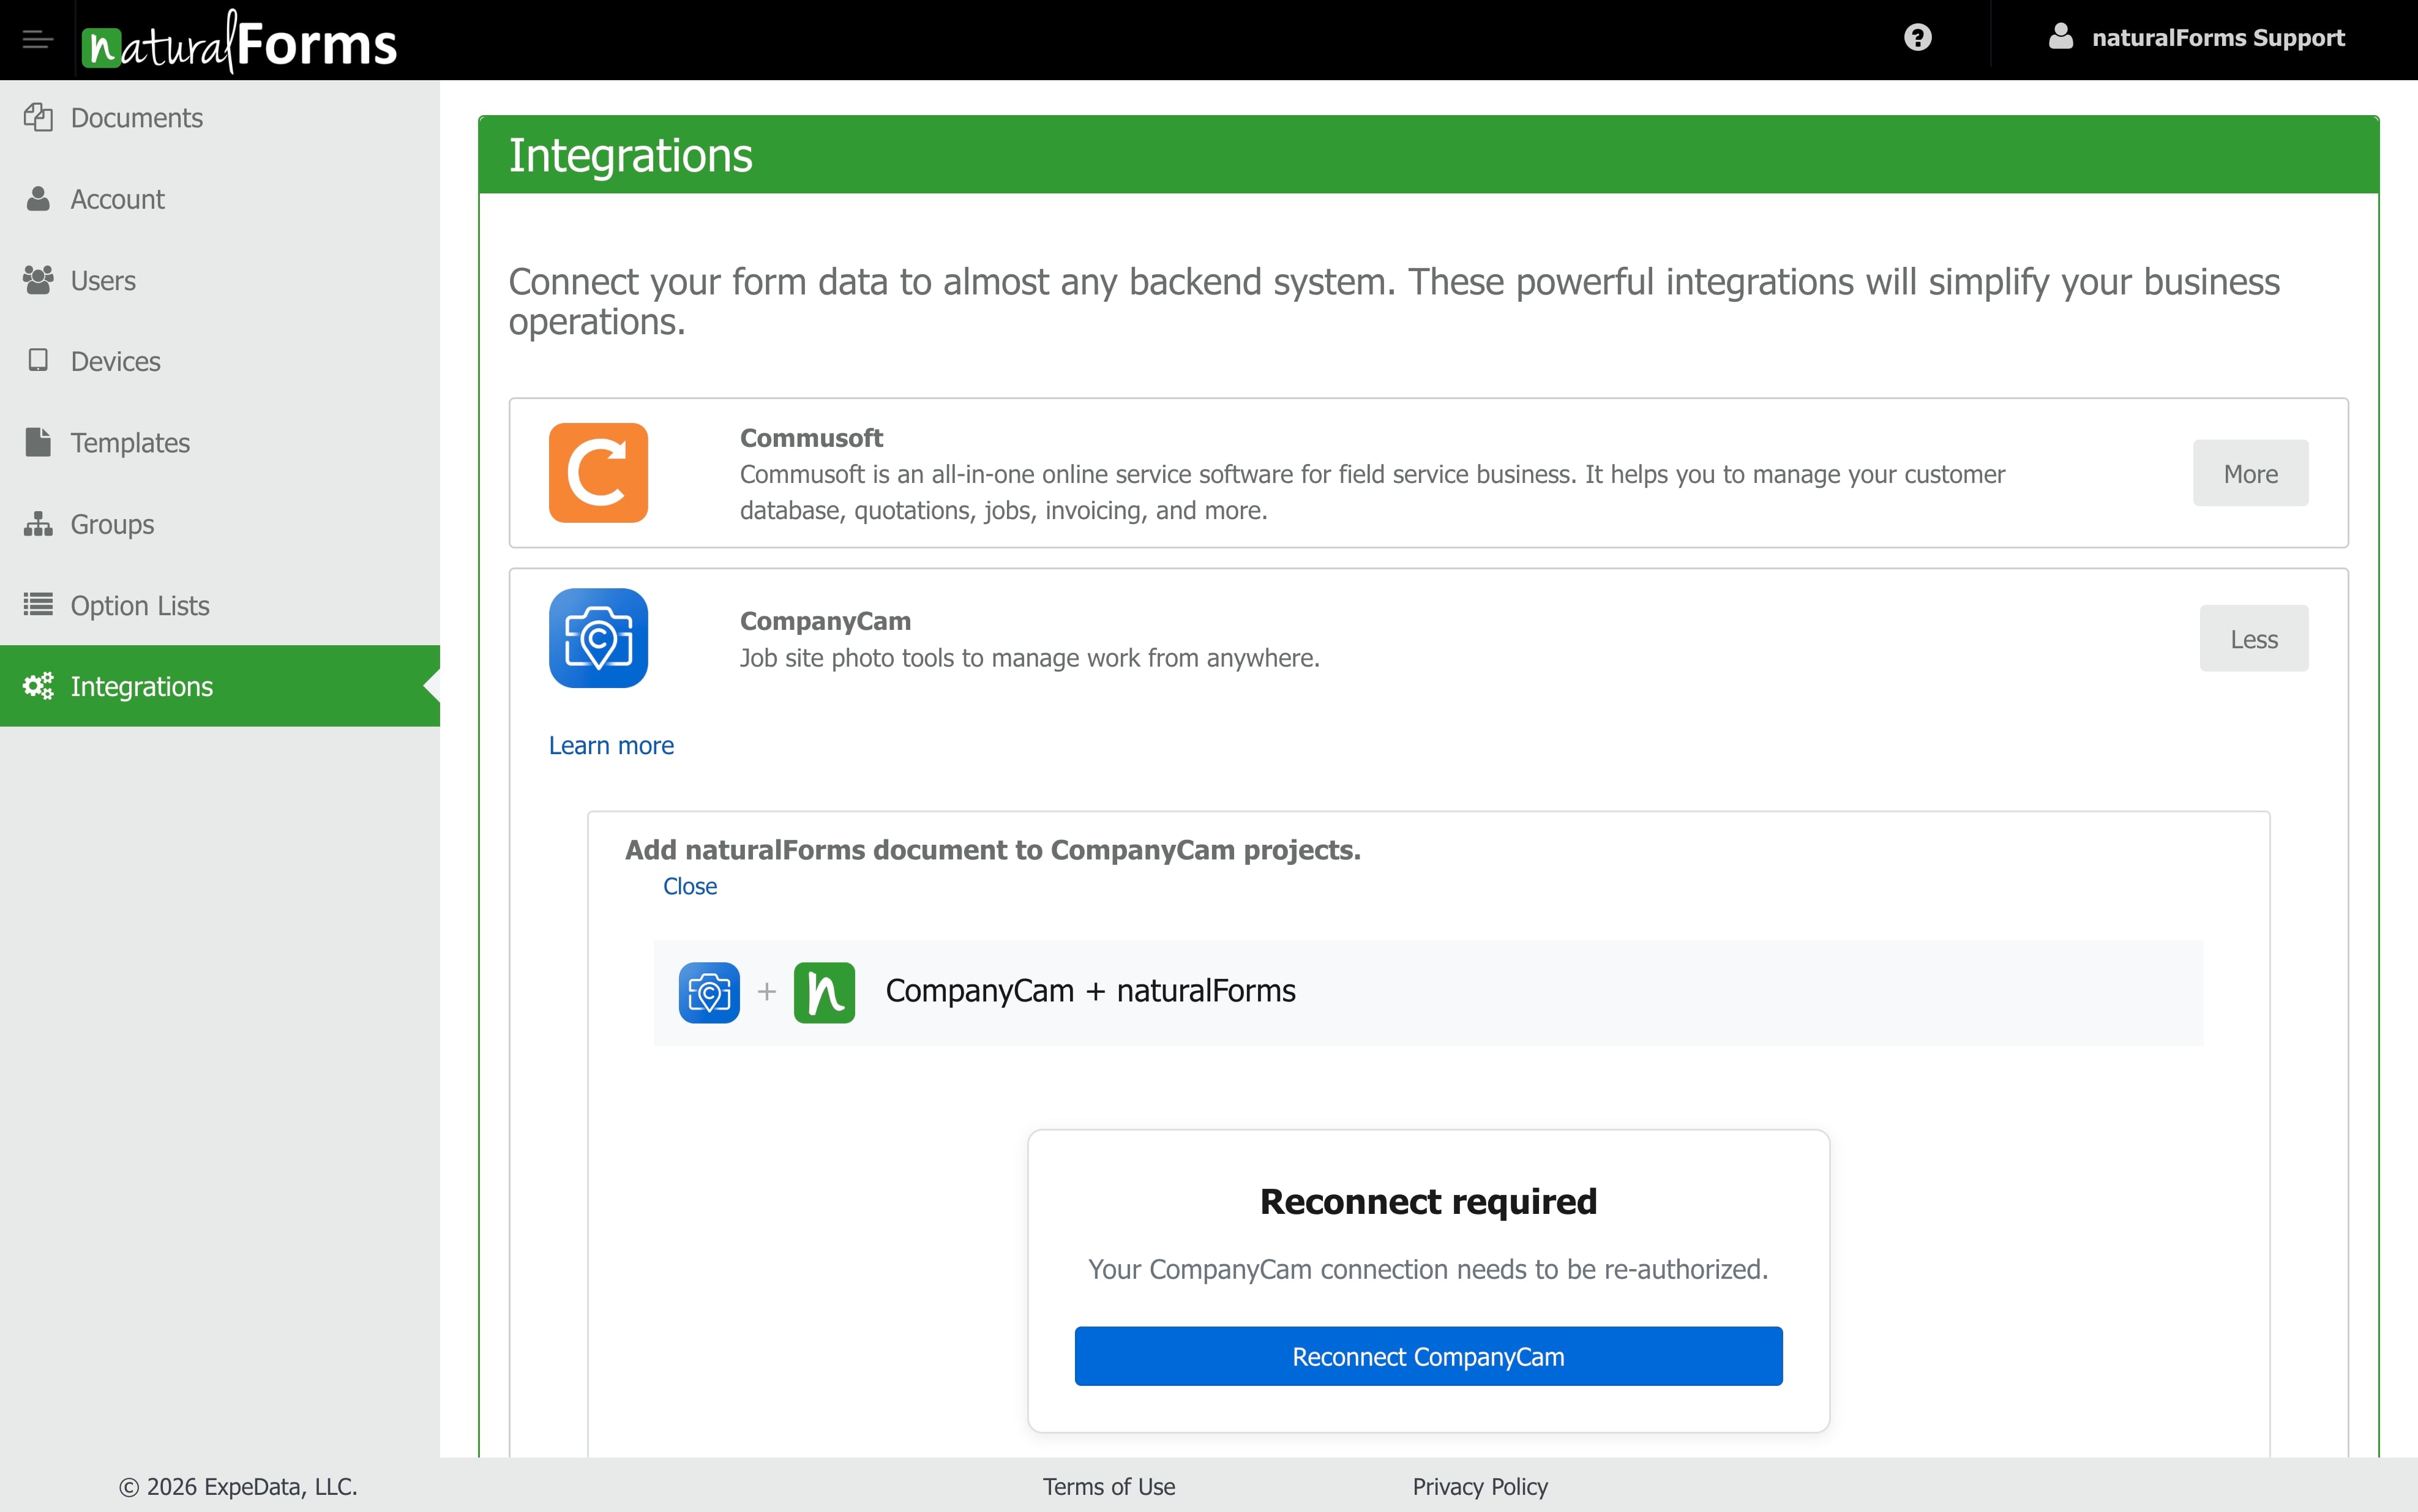
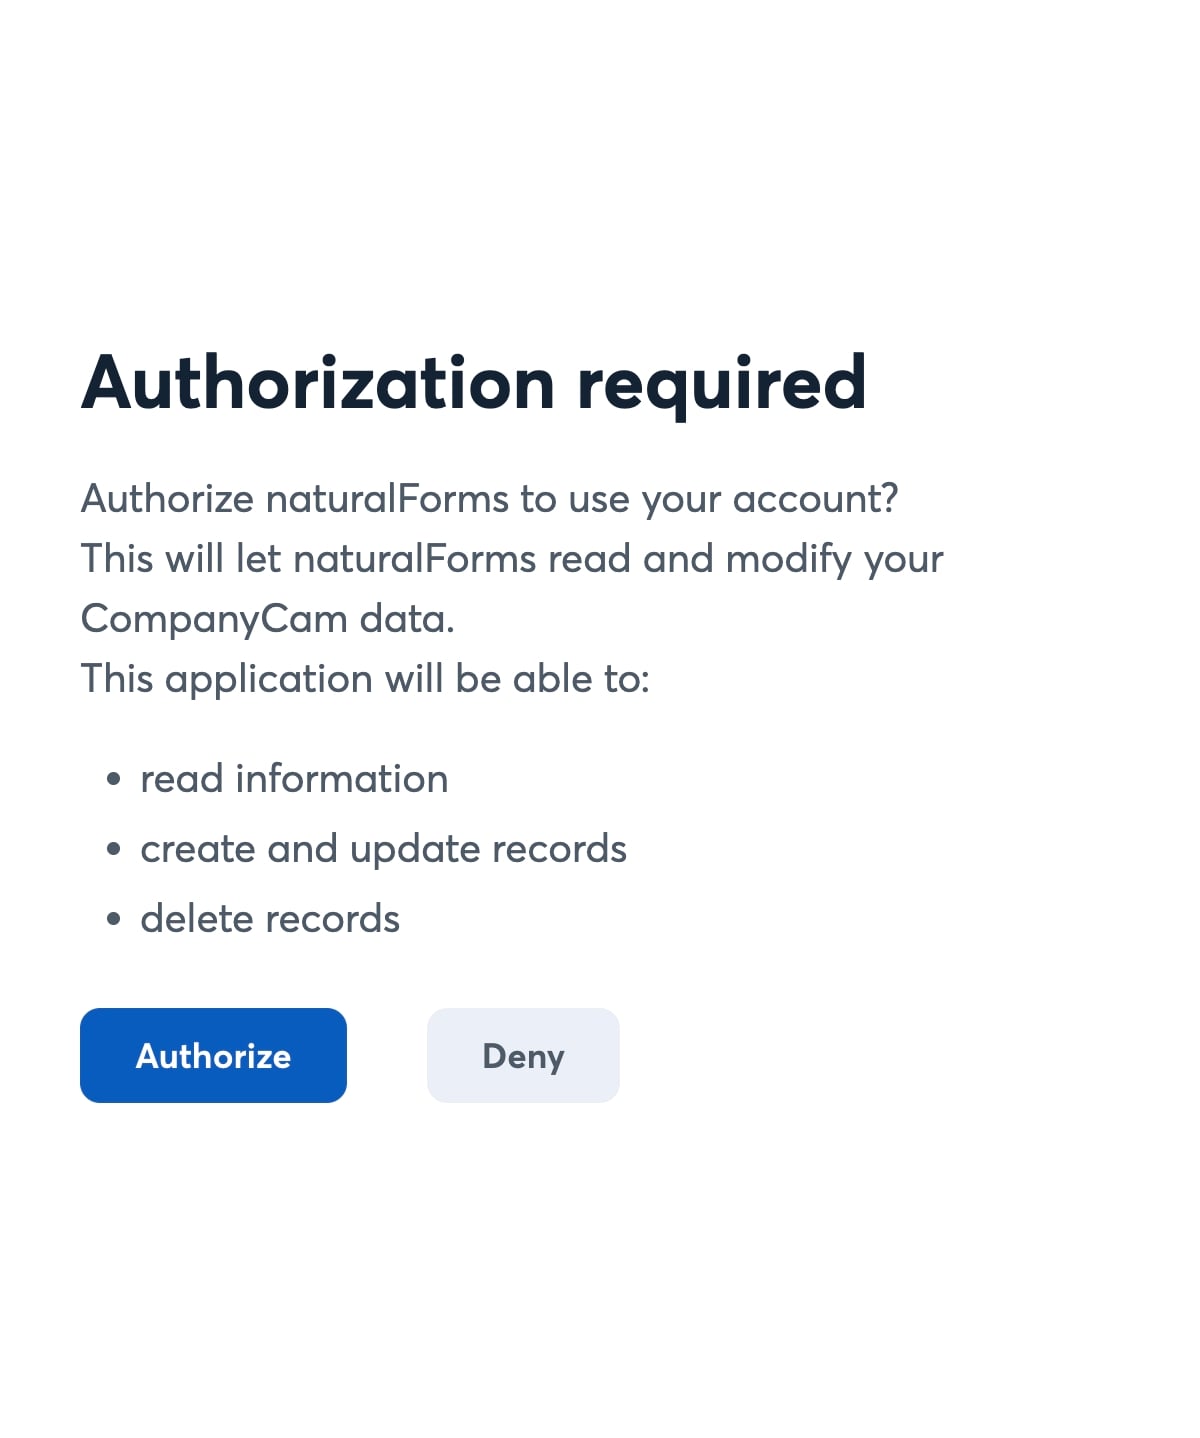
You'll be taken to CompanyCam to authorize the connection. Click Authorize to allow naturalForms to work with your CompanyCam account.
Once authorized, you'll return to naturalForms and see "Connected as [your team]." Under Create CompanyCam Project Documents, turn ON each template you want to sync. When a document from an enabled template is completed in naturalForms, its PDF is automatically attached to the matching CompanyCam project.
Note: All templates from naturalForms are available for the integration. Templates may appear multiple times if they're also set up within naturalForms Groups (as per the Group column). Each time you add a new template, remember to enable it here if needed.
3. Start Using
The integration works two ways — you can start a document from CompanyCam, or from within naturalForms. Either way, the form prefills with the CompanyCam project's details, and the completed PDF syncs back to that project's Files. Use whichever fits your workflow. It works everywhere naturalForms does — the web/desktop app in your browser and the iOS and Android apps.
Watch how to create and complete a document:
A. Install the naturalForms App | Make sure you have installed the naturalForms app on the device (i.e. tablet or phone). The web or URL version of the naturalForms app can also be used as well (available here).
Two ways to start
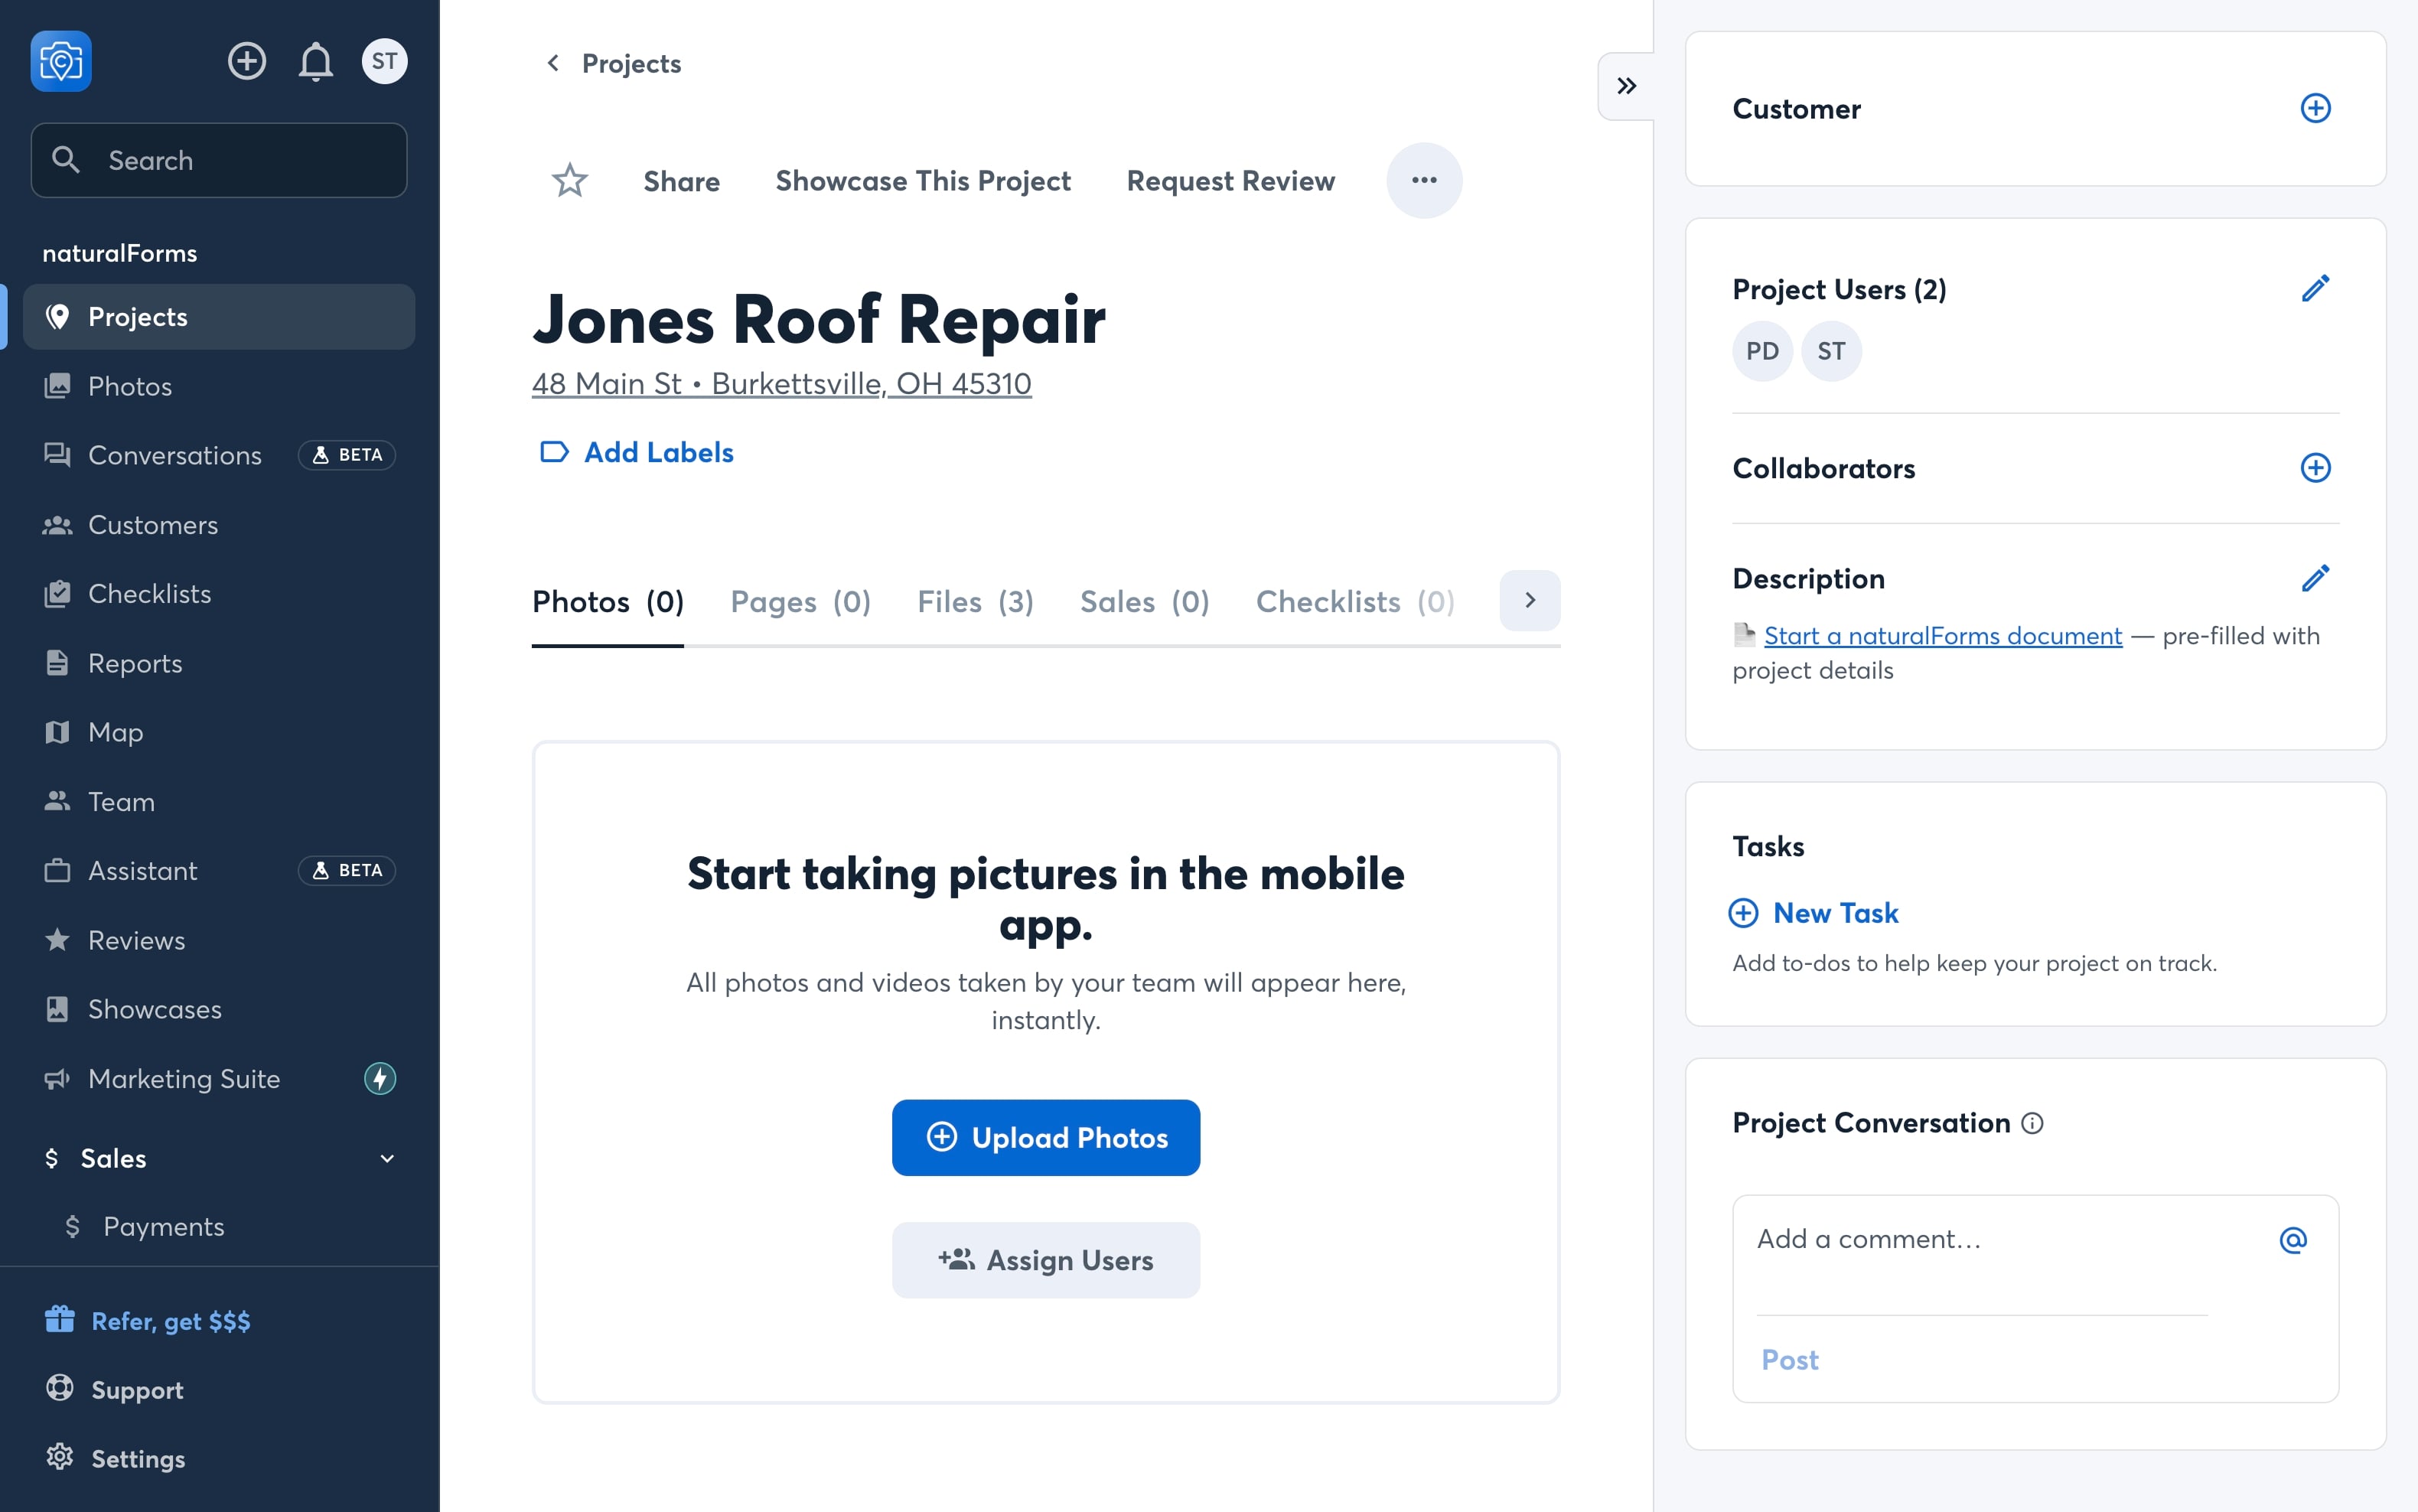
Option A — From a CompanyCam project | Open a project in CompanyCam and, in the project's Description, click "Start a naturalForms document — pre-filled with project details."
Option B — From within naturalForms | From within the naturalForms app (or web), select CompanyCam Project, then choose the CompanyCam project.
Then select the desired Project.
Then it's the same, either way
Select the form that you want to create.
Give the document a name and click Create.
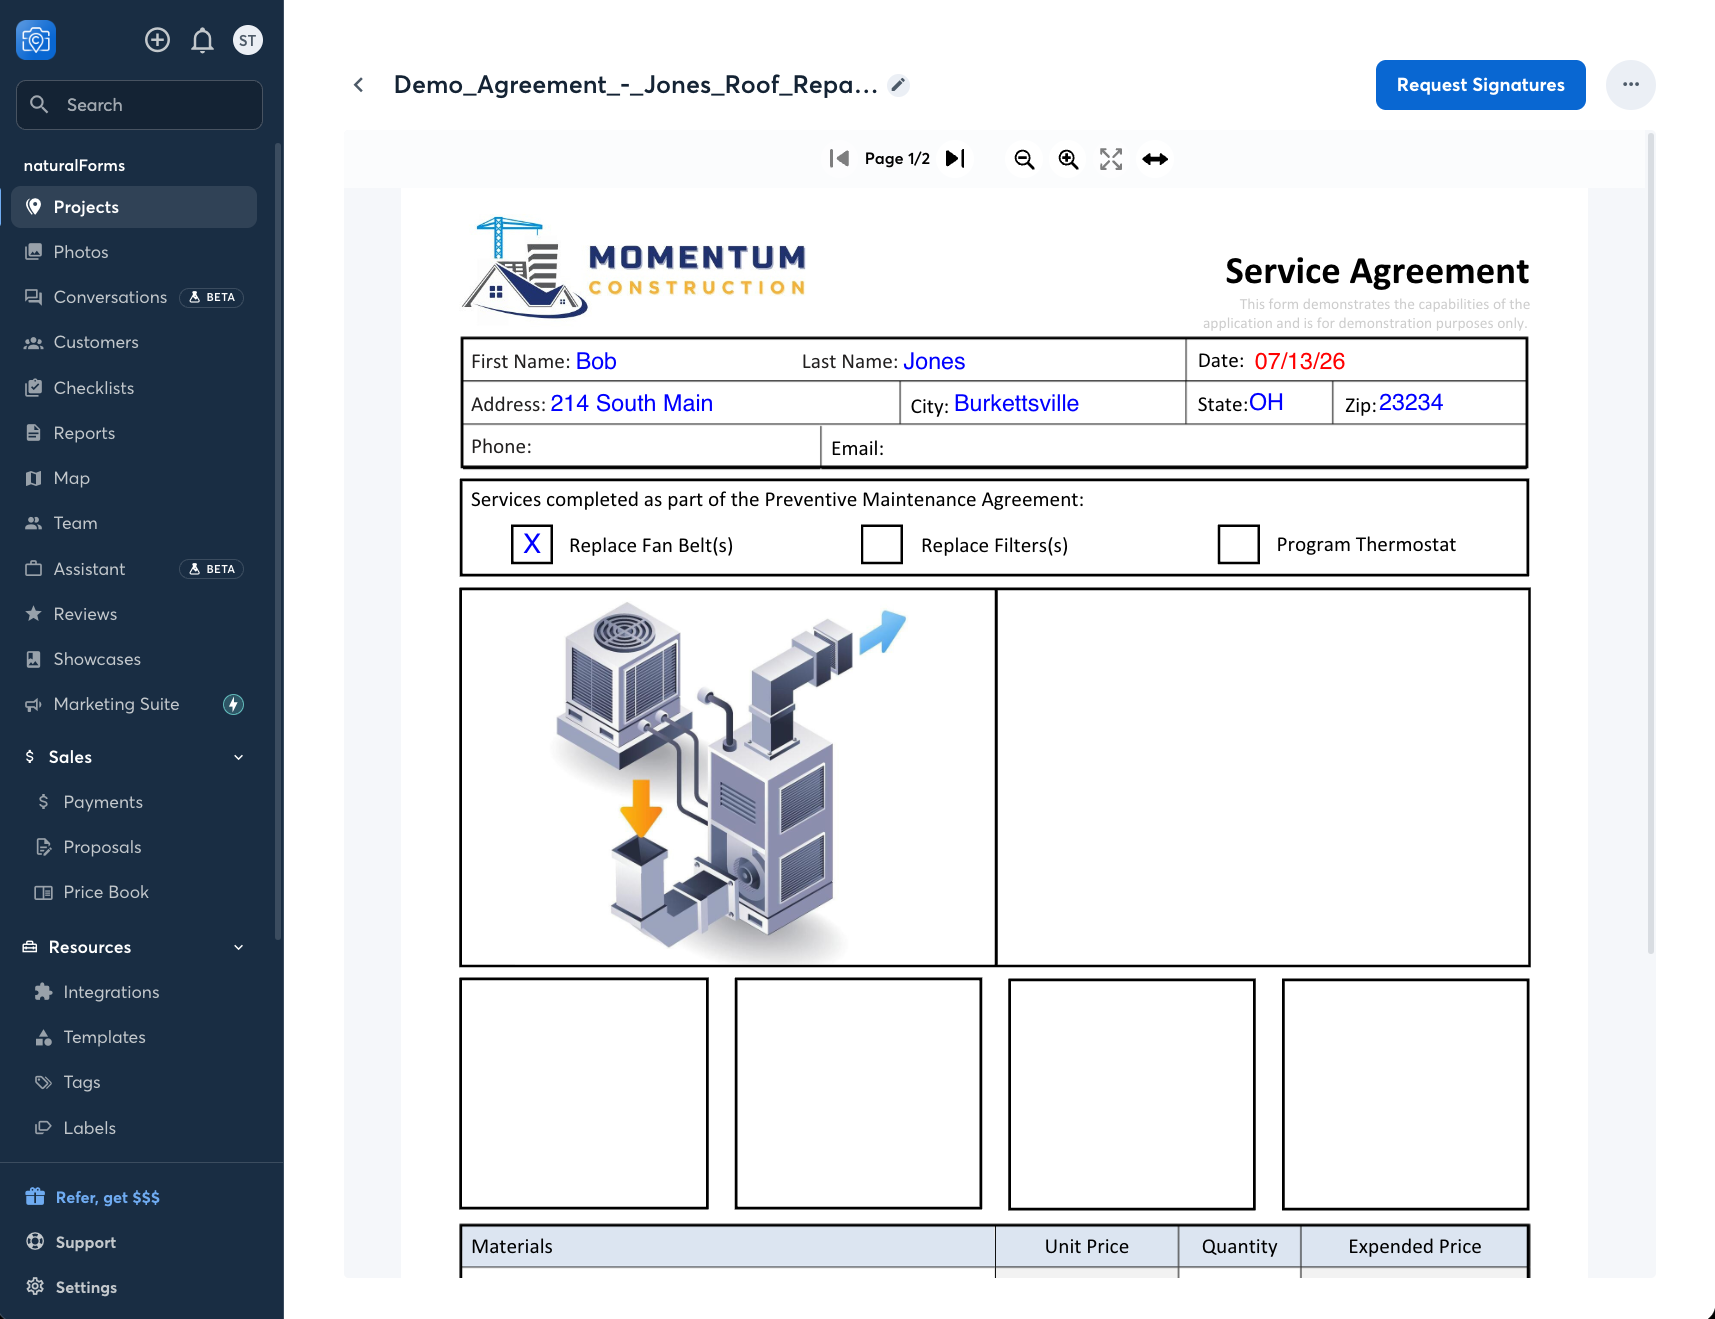
The document opens and prefills with the CompanyCam project's details — address, city, state, contact, and any other mapped fields. Fill in the remaining fields, check off completed work, add photos or a signature, and complete the document.
Where your completed documents go | Completed documents are automatically synced into the matching project inside CompanyCam and can be found in the project's Files tab. The finished document also lives in naturalForms, where it can be re-edited and re-completed anytime.

Open it right in CompanyCam to view the whole document — the completed form lives in the project, alongside the photos.
Common Questions:
Can I add my CompanyCam job photos directly to a naturalForms document?
Not automatically — for now, photos aren't pulled from CompanyCam into the document. To add a photo, it needs to be in your device's photo gallery (camera roll); from there you can drop it into any photo field on the form. So any job photo saved to the device can be added to the document as usual.
A closer photo connection is planned for a future update — so CompanyCam project photos could flow into documents automatically, and/or naturalForms photos could sync back into the CompanyCam project. We'll update this article when it's available.
Can I sync CompanyCam to work with more than one naturalForms account?
Unfortunately, no. Due to security and privacy standards, CompanyCam can only be synced with one naturalForms account for a company.
If you have any questions please submit a support ticket and a member of our team will assist you.